Lens Test
- Aug 29, 2022
- 10 min read
Updated: Apr 25
Why is choosing the right lens so important?
Cinema lenses are becoming more and more perfect. The ARRI Signature Primes for example, have hardly any blemishes: barely noticeable lens flares, distortions or vignetting. Ideal for modern digital film cameras and perfect for VFX in post-production.
Gone are the days when a simple bleach bypass in the lab defined a look. Color grading dominates the film look today and the possibilities are almost endless. As more and more decisions are made in post production today, the DP's influence on image composition is steadily diminishing.

Stills from "Framed" shot with ARRI Signature Primes on the Venice 2 in 8K. Left: Original. Right: Enhanced with lens flare and face retouch in post-production..
In color grading, vignettes are added, actors' skin is softened, and lens flares are set. Thanks to these perfect lenses, it's easy to put a look on the recorded image. However, it's almost impossible to remove the look of an old lens from an image. That's why many DPs are increasingly using retro lenses to add their own signature to it.
While the locations, set design, equipment, costume, makeup and lighting can have a much bigger impact on the look than the lens. Nevertheless, it is our choice and should therefore be well considered.
The start
The choice of a lens series can have many reasons. It is also not reprehensible to want to use the latest equipment and follow a trend. As long as the lenses are suitable for the story, I see no problem in it. I even recommend trying out new things especially for commercials.
The important thing is that we already have the look we want in mind. For example, if you know that you want to work with little depth of field and will therefore shoot full frame (FF) and with an open aperture, many lenses are out of the question.
In our test, we only compared spherical full frame-, Super 35mm prime-, and zoom lenses. If you are interested in anamorphics, I recommend this page from Sharegrid:
It's more important to understand what lens tests are about and to do them yourself than to think that you can read something on the Internet and then know it all. It would also be absurd to think that the compressed shots you can see online are on par with the Venice's XOCN-XT shots in 6K. That's why I will not list all the results here. Nevertheless, I have picked out a few very interesting examples that will give you a good insight.
The focal lengths
The decision on which focal lengths I need is made after intensive discussions with the director. If special focal lengths are only used on individual days, then I don't rent them for the entire shooting period. The point is not to save the production money, but to invest the money properly. Unfortunately, the budget always has a big impact on the look of the film. We have it in our hands to keep this influence as low as possible.
How to find the right focal length?
The shot size should not determine the focal length. Although it's easy to be tempted to shoot all close ups with a 75mm and all long shots with an 18mm. The decision of which focal length to use strongly determines the look of the film and goes far beyond just the look.
With no lens series are all focal lengths available. As you can easily see in this table. In addition, individual focal lengths can be rare, such as the Zeiss HS MK3 65mm, and are not available from every rental company.

If focal lengths are missing, its important to find out whether diopters can be used or with which lenses you can combine your already made choice. What fits together in the end can only be found out by rigorous testing.
Logically, you can only get continuous focal length coverage with zoom lenses. Here, however, the question is just as much whether the range is sufficient. The 1971 Cooke Varotal, which was used to shoot the film "Stalker" by Andrei Tarkowski, was the very first Cooke zoom lens and already covered the focal lengths between 20mm and 100mm. The latest Cooke Varotal/iFF lenses cover the range from 30mm to 215mm in total. In combination with a full frame sensor, even at wide angle, a much larger range than the old Cooke zoom. But you have to keep in mind that with a full frame sensor you have less depth of field compared to the Super 35mm sensor.
Depth of field
The depth of field is determined by the focal length, the optical speed (aperture), the distance the lens is set to focus, the disk of confusion, the front nodal position and the position of the entrance pupil of the lens. Basically, the larger the exposed sensor, the longer the focal length, the closer the focused area, and the more open the aperture, the less depth of field you have.
Example:
A Super 8mm film camera basically has more depth of field than a Super 35mm camera. An 18mm lens has fundamentally more depth of field than a 75mm lens. An image focused at 4 meters has basically more depth of field than one focused at 30cm, and an f/11 causes more depth of field than an f/2.
The quality of sharpness and blur as well as fall off / roll off are different for all lenses. While older lenses tend to be softer, i.e. appear less sharp, new lenses are usually sharper and can be used for a higher resolution. Nevertheless, you should test the sharpness effect yourself. Because you can't judge this with compressed videos from the Internet. You don't know if the Focus was set correct and it might be sharpened or softened in post. This is also the case with vignettes, which are often used in color grading to draw the viewer's attention to the center of the image.
Vignetting
Lenses that vignette and distort the image are a problem for VFX and CGI additions in post production and can cause considerably higher cost. They should therefore be avoided on shoots that are heavy on visual effects. As mentioned earlier, it is better to shoot as clean as possible and add the characteristics of a lens later in post-production.
In general, long focal length lenses vignette less than short focal length lenses. This is clearly shown by the following example:

Only the bottom three rows are FF lenses and expose the complete full frame sensor of the Venice. It's easy to see that the Canon Sumire has the finest vignetting of the eight lenses.
The lens manufacturers always mention that the lens series are perfectly matched. The fact that this is not always the case can be seen in the above test: The Sony 50mm stands out a bit in terms of color and the Tokina lens series also seems to have more magenta content with a longer focal length.
The same can be seen in the test with the Zeiss HS 50mm lens:


We tested the lenses in the same lighting condition and used the values of the wide angle lens as a reference. Thus, there should basically be no noticeable differences beyond the focal lengths. Nevertheless, they are present, as can be seen well with the increased blue value of the 50mm Zeiss HS lens. These differences can have various reasons and are not suitable for making a fundamental statement about the lens brand. It only concerns the lens we tested and may again be completely different with another lens of the same brand.
Instead of drawing a wrong conclusion from our result, we should first of all remember that these discolorations can be present and we should test them in advance, preferably via a color chart.
Colors
Especially when combining different lens series, the recording of a color chart is indispensable. Here, the shots should be color graded before shooting starts in order to create 3D LUTs for the individual lenses and then also color graded in post-production.
Here are a few examples for comparison:
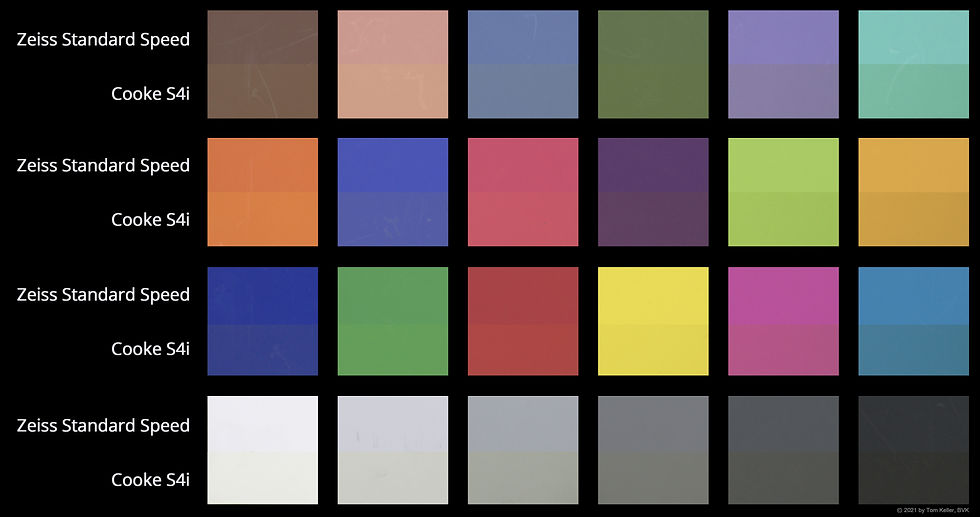


Just as you have to pay attention to how lamps (especially LEDs) render colors, you have to do the same with lenses.
Each lens element within a lens is coated, and this coating changes colors even though it is only one nanometer ( 0.000001 millimeter) thick. Since zoom lenses have more lenses than fixed focal lengths, the differences here are particularly obvious. Basically, modern, expensive lenses are manufactured in such a way that the so-called coating has hardly any influence on the colors. However, if you go for inexpensive lenses, you can assume that savings have been made here as well.
Coating is important because glass reflects 4% of light. The coating can bring this value below one percent, which in turn helps prevent flares and capture a cleaner, better image.
Lens Flares
Lens flares are one of the clearest distinguishing features of a lens: no two are alike, almost like a fingerprint. While they used to be considered a flaw and avoided at all costs, today they are used purposefully and creatively. Even in completely computer generated images and animated films, people like to resort to flares. Flares are caused by the light reflected back and forth from the individual lens elements that end up hitting the sensor. They are most visible with hard light sources. Here are a few examples from our test:

In the lens flares, you can clearly see that each manufacturer coats their lenses with a different combination of silicones and metals (sometimes rare earths). In addition to the different colors due to the coating, the size, shape and number of lens elements, the iris diaphragm, angle, and intensity with which the light source shines into the lens also have an impact on the flare look.

So unless you're shooting entire films with just one prime lens like Ozu Yasujirō the look of a film inevitably becomes less clearly defined with each prime lens added. As you can easily see from the two examples above, both the Zeiss Compact Primes and the Zeiss Standard lenses have a similar style among themselves, but they still differ significantly from each other.
If constant flares over several focal lengths are important, it is better to use a zoom lens:
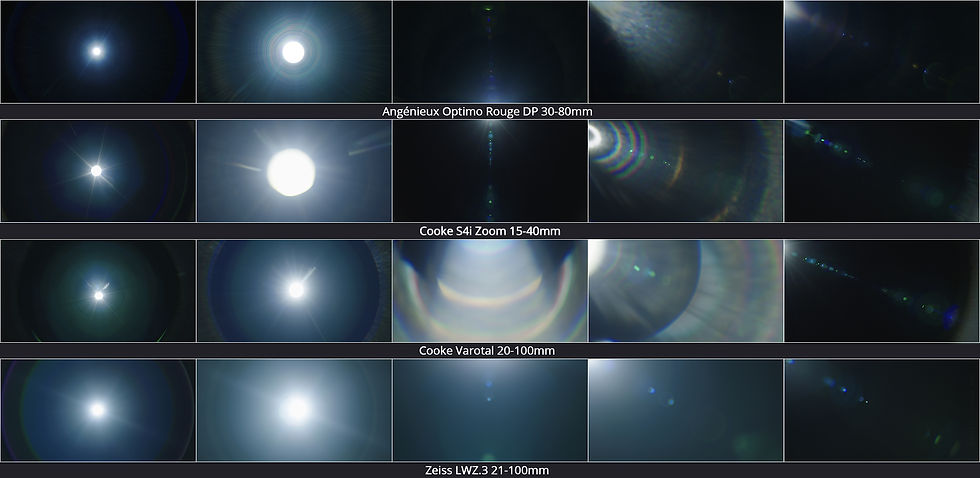
With zoom lenses, the so-called ghost line (the line consisting of individual, usually circular artifacts) becomes clearly visible. Depending on the setting of the focal length, however, the flare of a zoom lens also changes.
Things that should not be encountered during a test:
Besides the individual lenses, directly incident light also brings other things to light. For example, dust on and between the lens elements. Unfortunately, the latter cannot be removed so easily and is often found on older lenses in particular.

Even scratches that otherwise do not noticeably change the image can be easily seen in lens flares, as here with the old Cooke Varotal zoom. As a general rule, I would not use lenses with scratches on them. But with a 50-year-old zoom, it's understandable that repairing it is no longer possible. And so one accepts the flaw as a new characteristic of the lens.
However, the following examples are problematic:

Here you can see oil spreading on a lens element. It has come off the grease used to lubricate the mechanical parts like the iris diaphragm. This image is not a photo of a lens surface, but a real film shot of the Venice taken with this lens. The fact that we can see this oil film so clearly on the image at all shows that something else must be wrong with the lens.

Here is another picture of the same lens: The incident light hits the inside of the iris diaphragm here and makes it visible. This would also not be possible if there were not a problem with the lens element housing as well.
Even though I find these pictures incredibly beautiful, such a lens is not suitable for shooting and must be repaired by the rental company, which was done immediately after our test. The lenses got a new housing and life.

Another problem you can encounter is a fungus on the lens. This happens when you shoot in humid environments for a longer period of time. You have to act quickly here, because over time this fungus attacks the coating and makes the lens unusable.
Now we've gotten a bit off topic, because basically you shouldn't encounter such things during a lens test. But it can't hurt to know that such problems exist. The fact that many DPs before me don't seem to have become aware of it shows me that there is probably too little talk about it.
Bokeh
One element that is easy to judge even in online videos is the shape of the Bokeh. The appearance of bokeh is defined by the shape and number of iris diaphragm blades, as well as the aperture setting. The bokeh circle is compressed against the edge of the lens, as you can see in the comparison taken from our test. In each case, the first of the three bokeh is from the lower left corner of the image (16:9 aspect ratio), the second bokeh is from the center of the left edge of the image, and the third is from the center of the image. All three bokeh have the same light source. It was not changed during the shooting. Instead, the camera was panned to get the three different positions. So the differences in intensity within the three bokeh are due to the lenses, not the light source.

In these examples you can clearly see how different the bokeh can be. As soon as the aperture is closed, you can also see the number and shape of the blades. The very characteristic bokeh of a Zeiss Standard lens can only be recognized when the aperture is closed. With the aperture open, the bokeh is more like that of a Canon Sumire lens.

So if you want to use bokeh specifically in your own look, that also means defining your aperture for the shot. This in turn influences the depth of field and many other factors. Testing gives you the opportunity to find the look for your next project.
Do not lose focus
Sometimes you almost can't stop testing and comparing. That's the moment when you should grab your camera and your favorite lenses and leave the studio. After all, you can only get a real feel for the lenses on the film set, and that's what we're prepared for now.

If this blog post wasn't enough, you can read a detailed comparison test of the Sony CineAlta
Primes and the Cooke s4/i that I did a few years ago here.
Comments